How I Bought My First House From Out of State

Andrea Lawson in a chair hammock enjoying her condo balcony

How I Bought My First House From Out of State

And how I survived when my loan fell through before closing.

Image: HouseLogic

Name: Andrea Lawson, 36

City: Madison, Wis.

Year of Home Purchase: 2014

Sale Price: $222,500

Home style: 2006 condo

Profession: Social worker

When Andrea Lawson got a dream job in a new city, she knew exactly where she wanted to live: an urban, walkable neighborhood near her new job in downtown Madison. Though she was hesitant to commit to buying a home before knowing for sure the job and city were the right fit for her, rental prices made buying the smarter financial move.

In just a two-day trip to Madison, she found a place she liked, made an offer, and had it accepted by the seller. All was great until her loan fell through prior to closing.

Before we talk about the horror story of your deal collapsing at the eleventh hour, let’s start with your house hunt. What made you take the plunge and buy a home in a new city, even before you’d started your new job?

Andrea: Actually, I wasn’t ready to buy. I wanted to rent a place. But prices of rentals were steeper than I expected, because of pressure from the University of Wisconsin and the tech industry. Students snapped up the best rentals, and lots of people wanted to be in the city center.

You switched gears in 24 hours, going from looking-to-rent to looking-to-buy. How did you manage that fast of a change?

Andrea: I only had a weekend to look because I was still working in Michigan at my previous job. I had to make a decision fast. I got my agent Kari Manson Hvam [a referral from a friend], to help me find listings of houses for sale. Her access to the MLS helped me see what was available. I had a price limit and geographic requirement. The agent said, “These are the four properties that fit what you are looking for.” I looked at all of them in one day.

How did you know when you found The One?

Andrea: The condo had all the things I wanted. It was open and had south-facing windows that let in a lot of light. It has one bedroom, but it also has a Murphy bed so I would have room for guests. It was in the city center where it’s happening, not out in the boring ‘burbs.

There were waiting lists for rentals. Was it tough to get the condo?

Andrea: Not really. I was the only interested buyer. The developer still had it and was renting it out. It was listed at $234,000. My agent was helpful in determining where to start negotiations, telling me not to lowball too hard. I started at $215,000, and I ended up paying $222,500.

Was it hard to get a mortgage?

Andrea: No. I had been saving for six years, so I had the down payment. I have great credit. My agent gave me a couple of names of lenders. I called each one and went with the one that had an appointment that afternoon. I made an offer in June and did the paperwork in July. I met with the lender midway through the process, and the lender assured me everything was fine.

But you got to the closing, and everything was not fine.

Andrea: No, it was not. We got ready to sign the paperwork, and the lender said they could not underwrite the loan because they were missing some information on their end. We were unable to close. So I was there with my cashier’s check, and I couldn’t get my condo. I couldn’t move in.

Good grief. Were you crushed?

Andrea: I was disappointed — mostly in the lender. I feel like they dropped the ball. Worst of all, I was staying in an Airbnb until I closed on the condo, and my time was up there. I had no place to go.

So you had no mortgage and no home. What did you do?

Andrea: Thankfully, my agent was able to talk to the seller, and they let me move into the condo immediately and rent it until I could buy it. My agent also helped me find a local lender, a local bank. The condo association recommended them, too, and said there were several other people in the building who had gotten mortgages from them.

Things went better with the local bank?

Andrea: Yes, they did a great job. I was able to close a week after the first deal fell through. The woman I worked with at the local bank was nice. She said, “I don’t know what the problem was [with the other lender] because everything you need is here.”

Did you ever find out the problem with the other lender?

Andrea: No. The lender seemed to be interpreting some requirements for offering a loan on a condo very strictly. But I’m not sure because the first lender didn’t respond to any communication after the deal fell through. My agent and the condo people both said they had never seen anything like that happen.

Your advice for a first-time home buyer?

Andrea: Confirm if things are on track [with the loan], then confirm again. And if you’re debating between renting or buying, like I was, buy. For me, the total cost of my mortgage was a little more than a rental would have been, but it’s worth the investment.

Is living in a city condo all you had hoped it would be?

Andrea: Yes, I’m three miles from my job, and I bike to work at least once a week.

Even in the winter?

Andrea: In Wisconsin? Ha! No, I take the bus.

4 Things Proactive Homeowners Do in September


Do This Now September illustration

Garden path lined with bushes alive with fall colors

Fall’s cooler temps are perfect for deck and yard improvements.


Ah, September. The weather is changing, and we’re getting back to our normal, post-summer routines.

It’s also a great time to give the house a little extra love and maintenance.

Stain your deck

Help your deck field what winter throws at it by re-staining it this month. September’s cooler temps and lower humidity make it the ideal time for this project.

Check Fire Extinguishers


According to the Red Cross, fires increase in the fall and winter. Keep your home fire safe by getting your fire extinguishers checked by a certified professional. Fire extinguishers do break down and malfunction. In fact, after six years they need to be emptied and reloaded. If you haven’t already, buy one for each floor — and the garage.

Spruce Up your yard

Aerate your lawn, reseed or fertilize it if needed, and plant perennials and shrubs (often on sale now). Your lawn will green up faster after winter, and the shrubs and perennials will have a chance to establish roots before the first freeze.

Inspect Your Home’s Exterior


Spending money on roof repairs is no party, but neither is handing out buckets to the family to catch leaks in a winter storm. Inspect your roof — and other big-ticket items, like siding, grading, and gutters — before you’ve got problems. You’ll cut costs by fixing them now and stay dry and warm all winter long.


Looking to buy or sell a home?

Chris Lee and Rusty’s Team at RealtySouth  205-233-5183

new team photo


Is your home and family truly market ready?

reviews_insights_and_bestpractices_realestate_market_home_buy_sell_list_seller_buyer_listing_agent_broker_FSBO_tip_tips_suggestions_check


More than just a pretty face

If you’re thinking of selling your home, then the first thing you need to do is ask yourself whether your home (and your family) are really ready to list. That’s right. Both need to be “market-ready” before-hand. The good news is that there’s an entire profession dedicated to helping you prepare for the process… your friendly neighborhood real estate agent.


What, you thought they were just there to show houses and help with contracts? That’s okay, it’s a common misunderstanding. While no one is more qualified than your agent to help you understand where your home sits in the market or how to maximize your ultimate ROI, we’ll walk through some pre-listing pointers. Hopefully, these will come in handy when you do reach out to an agent to explore selling.


So what is market-ready?

It’s good to keep in mind that some things in real estate are subjective (like your home’s beauty), while other things are very specifically-defined (like legal and contractual terms). While “market-ready” is a loose phrase often referring to a home that is about to be listed for sale, it is generally understood that a market-ready home has met a basic, professional standard of readiness for the market.

Of course, there is another assumption that comes with this – one that you and/or your family will need to consider long before you begin the process of listing. You need to decide if you and your family are market-ready. That is… are you fully prepared to go through the process of selling your home? No, we’re not trying to frighten you out of the process – quite the opposite, in fact. Instead, we’re hoping that these steps will help ready you for the best possible home-selling experience.


Are you market-ready?

Selling your home is a process that assumes certain things will be managed on your end (with or without an agent). So, you’ll need to be ready to take on the extra work without excessive stress. Like a wedding (or even winning the lottery), some stress can be a good thing and even an exciting life-change for the whole family. So here are a few considerations to help prepare you for this adventure ahead…


  • Are you ready to move? You should make the decision to sell your home very thoughtfully. Consider the reasons why you want to sell. Are you selling because you need more space or a different layout? Are you selling because you think it would be a wise financial decision (given recent market trends)? If no one in your family is optimistic about selling, you probably need to reconsider your decision – this will be a team effort.


  • Are you ready to make a new home purchase? Have you decided where you want to move and have you done the research to identify neighborhoods and home types you’d be interested in? If not, take the time to plan for a place to land when your home sells. Having your dream home laid out in advance will help your agent from the starting gate!


  • Are you ready to make your home market-ready? You’ll see more information on this topic below. For now, make sure that you have the energy and commitment to prepare your home for a profitable sale. This commitment may involve some long hours in the evenings or even some financially-backed touch-ups to your home and property.


  • Are you ready to treat your home as a product? When you sell your home, you’ll need to start thinking about it as a product. You’ll need to compete with comparable homes in the neighborhood and on the market, which may require doing things that you wouldn’t otherwise do. For example, you’ll likely need to repaint those purple living room walls or prepare your kids to remove those epic band posters.


  • Are you ready to set a realistic price? Homes that are priced right when they’re first listed tend to sell for more than homes that are overpriced and sit idle on the market before ultimately dropping in price. Don’t use the price of your home to test the market. Select a trustworthy real estate agent and take their advice in terms of pricing at market value in order to be competitive with similar homes in your area.


  • Are you ready for some stress during the selling process? You’ll need to keep the house clean, set realistic showing timeframes and be prepared to lock up your pets and leave the house when buyers are coming. Setting aside some funds to take the family out at last-minute notice can ease some of this stress… now it’s less of a 15-minute vacate warning and more of a spontaneous pizza night!

Is your home market-ready?

So all of the above is most important to you and your family. But let’s talk about your agent and the buyer’s experience because ultimately, you’re helping your agent tell a story to your prospective home buyers. Here are a few things that you can do to help ensure that your home sells for the highest price the market will bear…


  • Deep clean. Do a deep cleaning of every part of the house and keep it clean until the closing. It’s recommended that you find a cleaning service to take care of the first deep-clean inside as well as a few of the external heavy-lifting items like a good pool-cleaning (if you’re not up to the task yourself). Plan on having your home on the market for a few months and doing a weekly or semi-weekly scrub to present your home in the best light!


  • Declutter. Pack non-essential items. Plastic bins are your friends. Pick up 10 of these and distribute amongst the household. Give your kids (if you’ve got ’em) a one-time pass to shove miscellaneous possessions in there and out of site. Then, neatly mark them and store them in the garage (ideally offsite in a storage unit if possible).


  • De-personalize. Remove items that make the home look like yours alone, such as family portraits, collectible displays, and so on. There is a school of thought that says you’re telling a story of a home that has been lived in, but more than two photos of someone else’s family can make a walkthrough somewhat creepy and distract visitors from imagining their story in your house.


  • Do repairs or updates as needed. Update landscaping, apply fresh paint in neutral colors, pressure wash the areas that need deep cleaning, replace worn carpeting, fix scratched floors, fix any plumbing issues, and so forth. Yup, we did mention that there was work ahead. Don’t worry, just take it one step at a time. Create a list of 10 big items that have to happen in the next 2 weeks. Have the kids work on the daily items (dishwasher, basic clean-up, etc.), then you and your partner work on one big item per night with a night off here and there.


  • Organize. Clean out closets and pantries to avoid the perception that the house lacks sufficient storage. Less is more. Pack any items that don’t fit, have a dinner party with friends to use up extra food or better yet, donate it to your local food bank! Stage your dishes to the bare minimum… no, you don’t need the circus show of 37 pans falling out of the cabinets when the open house kicks into full gear.


  • Stage the house. Get ideas from your real estate agent or hire a professional stager. Remember, your goal is not to update the story of you, rather to create enough blank space on your home’s canvas so that the parade of home buyers about to come through can begin working on their own dreams. 
    Looking to buy or sell a home?

    Chris Lee and Rusty’s Team at RealtySouth  205-233-5183

    new team photo


How to Price Your Home Like the Savviest Sellers

4 things canny home sellers do when pricing their homes.


Home pricing is more of a science than an art, but many homeowners price with their heartstrings instead of cold, hard data.

Smart sellers know that crunching the numbers is always the better route to an accurate home price. Here’s how they do it.


#1 They Avoid Overpricing

Homeowners often think that it’s OK to overprice at first, because — who knows? — maybe you’ll just get what you’re asking for. Although you can certainly lower an inflated price later, you’ll sacrifice a lot in the process.

Just ask Candace Talmadge. She originally listed her Lancaster, Texas, home for $129,000, but “eventually had to accept the market reality” and chop $4,000 off the price.

The home’s location proved challenging: Buyers were either turned off by the area — a lower-income neighborhood south of Dallas — or unable to afford the home.

“Sellers have to keep in mind the location,” says Talmadge. “Who are going to be the likely buyers?”

The most obvious pitfall: A house that remains on the market for months can prevent you from moving into your dream home. Already purchased that next home? You might saddle yourself with two mortgages.

“You lose a lot of time and money if you don’t price it right,” says Norma Newgent, an agent with Area Pro Realty in Tampa, Fla.

And worse: Continually lowering the price could turn off potential buyers who might start wondering just what is wrong with your home.

“Buyers are smart and educated,” says Lisa Hjorten of Marketplace Sotheby’s International Realty in Redmond, Wash. “You’re probably going to lose them.”

#2 They Don’t Expect Dollar-for-Dollar Returns

It’s easy for homeowners to stumble into two common traps:

  1. Conflating actual value with sentimental value — how much they assume their home’s worth because they lived there and loved the time they spent there.
  2. Assuming renovations should result in a dollar-for-dollar increase in the selling price — or more.

“Many homeowners think, ‘Of course my home is worth a bazillion dollars,’” says Newgent. If they put in a few thousand dollars worth of new flooring, for example, they might overestimate the upgrade’s impact on the home’s value into the tens of thousands.

Talmadge’s Texas home came with a built-in renovation trap: It was already the nicest home in the area, making it harder to sell. Major additions had inflated the square footage — and the price, according to one appraiser — without accounting for the surrounding neighborhood. That created a disconnect for buyers: Wealthier ones who might be interested in the upgraded home disliked the neighborhood, and less affluent buyers couldn’t afford the asking price.

“Don’t buy the nicest home on the block” is common real estate advice for this reason.

That’s not to say that renovations aren’t worth it. You want to enjoy your home while you’re in it, right? Smart renovations make your home more comfortable and functional but should typically reflect the neighborhood. A REALTOR® can help you understand what certain upgrades can recoup when you sell and which appeal to buyers.

Another culprit for many a mispriced home is online tools, like Zillow’s “Zestimate,” that prescribe an estimated market value based on local data.

The estimate is often wildly inaccurate. A Virginia-area real estate company, McEnearney & Associates, has compared actual sold prices with predicted online estimates for several hundred homes in the area for the past few years and concluded the predictions failed half of the time.

#3 They Use Comparable Sales (also Known as “Comps”)

The best pricing strategy? Consult a real estate agent, who will use something called comps (also known as “comparable sales”) to determine the appropriate listing price. They’re not just looking at your neighbors; they’re seeking out near-identical homes with similar floor plans, square footage, and amenities that sold in the last few months.

Once they’ve assembled a list of similar homes (and the real prices buyers paid), they can make an accurate estimate of what you can expect to receive for your home. If a three-bedroom bungalow with granite countertops and a walk-out basement down the block sold for $359,000, expecting more from your own three-bedroom bungalow with granite countertops and a walk-out basement is a pipe dream.

After crunching the data, they’ll work with you to determine a fair price that’ll entice buyers. The number might be less than you hope and expect, but listing your home correctly — not idealistically — is a sure way to avoid the aches and pains of a long, drawn-out listing that just won’t sell.

#4 They Adjust the Price When Needed

Once your home is on the market, you’ll start accumulating another set of data that will serve as the ultimate price test: how buyers react.

Agent Hjorten says there’s an easy way to tell if you’ve priced too high: “If we have no showings, it’s way too high. Lots of showings and no offer means you’ve marketed well — but it’s overpriced once people get inside.”

Talmadge didn’t struggle with showings. She says a number of people were interested in the home, but not enough at the price. In the end, Talmadge sold her home for $125,000, with a $5,000 seller’s assist, a discount on the cost of the home applied directly to closing costs.

“It all boils down to location, location, location. In [another] neighborhood, our house might well have sold for well over $130,000,” Talmadge says.

When it comes to finding a buyer, pricing your home according to data — and the right data, at that — is crucial to making the sale.


Looking to buy or sell a home?

Chris Lee and Rusty’s Team at RealtySouth  205-233-5183

new team photo


© Copyright 2018
NATIONAL ASSOCIATION OF REALTORS®

https://assets.contently.com/xdomain/xdomain_cookie.html#%7B%22namespace%22%3A%22contently%3Aanalytics%22%2C%22window_origin%22%3A%22https%3A%2F%2Fwww.houselogic.com%22%2C%22iframe_origin%22%3A%22https%3A%2F%2Fassets.contently.com%2Fxdomain%22%2C%22debug%22%3Afalse%7D

https://assets.bounceexchange.com/assets/bounce/local_storage_frame9.min.html#396

What Not to Do as a New Homeowner


Avoid these easy-to-prevent mistakes that could cost you big time.

Image: Paul Edmondson/Stocksy United

You’ve finally settled into your new home.

You’re hanging pictures and pinning ideas for your favorite bath.

But in all your excitement, are you missing something? Now that you’re a bonafide homeowner are there things you should know that you don’t?

Probably so. Here are six mistakes new homeowners often make, and why they’re critically important to avoid.


#1 Not Knowing Where the Main Water Shutoff Valve Is

Water from a burst or broken plumbing pipe can spew dozens of gallons into your home’s interior in a matter of minutes, soaking everything in sight — including drywall, flooring, and valuables. In fact, water damage is one of the most common of all household insurance claims.

Quick-twitch reaction is needed to stave off a major bummer. Before disaster hits, find your water shutoff valve, which will be located where a water main enters your house. Make sure everyone knows where it’s located and how to close the valve. A little penetrating oil on the valve stem makes sure it’ll work when you need it to.

#2 Not Calling 811 Before Digging a Hole

Ah, spring! You’re so ready to dig into your new yard and plant bushes and build that fence. But don’t — not until you’ve dialed 811, the national dig-safely hotline. The hotline will contact all your local utilities who will then come to your property — often within a day — to mark the location of underground pipes, cables, and wires.

This free service keeps you safe and helps avoid costly repairs. In many states, calling 811 is the law, so you’ll also avoid fines.

#3 Not Checking the Slope of Foundation Soil

The ground around your foundation should slope away from your house at least 6 inches over 10 feet. Why? To make sure that water from rain and melting snow doesn’t soak the soil around your foundation walls, building up pressure that can cause leaks and crack your foundation, leading to mega-expensive repairs.

This kind of water damage doesn’t happen overnight — it’s accumulative — so the sooner you get after it, the better (and smarter) you’ll be. While you’re at it, make sure downspouts extend at least 5 feet away from your house.


#4 Not Knowing the Depth of Attic Insulation

This goes hand-in-hand with not knowing where your attic access is located, so let’s start there. Find the ceiling hatch, typically a square area framed with molding in a hallway or closet ceiling. Push the hatch cover straight up. Get a ladder and check out the depth of the insulation. If you can see the tops of joists, you definitely don’t have enough.

The recommended insulation for most attics is about R-38 or 10 to 14 inches deep, depending on the type of insulation you choose. BTW, is your hatch insulated, too? Use 4-inch-thick foam board glued to the top.


#5 Carelessly Drilling into Walls

Hanging shelves, closet systems, and artwork means drilling into your walls — but do you know what’s back there? Hidden inside your walls are plumbing pipes, ductwork, wires, and cables.

You can check for some stuff with a stud sensor — a $25 battery-operated tool that detects changes in density to sniff out studs, cables, and ducts.

But stud sensors aren’t foolproof. Protect yourself by drilling only 1¼ inches deep max — enough to clear drywall and plaster but not deep enough to reach most wires and pipes.

Household wiring runs horizontally from outlet to outlet about 8 inches to 2 feet from the floor, so that’s a no-drill zone. Stay clear of vertical locations above and below wall switches — wiring runs along studs to reach switches.

#6 Cutting Down a Tree

The risk isn’t worth it. Even small trees can fall awkwardly, damaging your house, property, or your neighbor’s property. In some locales, you have to obtain a permit first. Cutting down a tree is an art that’s best left to a professional tree service.

Plus, trees help preserve property values and provide shade that cuts energy bills. So think twice before going all Paul Bunyan.


© Copyright 2018
NATIONAL ASSOCIATION OF REALTORS®

<img src=”http://b.scorecardresearch.com/p?c1=2&c2=6036432&cv=2.0&cj=1″> <img src=”//trc.taboola.com/1150914/log/3/unip?en=page_view” width=”0″ height=”0″ style=”display:none”>

https://assets.contently.com/xdomain/xdomain_cookie.html#%7B%22namespace%22%3A%22contently%3Aanalytics%22%2C%22window_origin%22%3A%22https%3A%2F%2Fwww.houselogic.com%22%2C%22iframe_origin%22%3A%22https%3A%2F%2Fassets.contently.com%2Fxdomain%22%2C%22debug%22%3Afalse%7Dhttps://assets.bounceexchange.com/assets/bounce/local_storage_frame9.min.html#396

Everything You Need to Know About the Pre-Approval Process


Desk with laptop and mug on it | Get Mortgage Pre-ApprovalImage: Pretty Providence

With your pre-approval in hand, sellers will know you’re a serious buyer.

You’ve probably heard of the “pre-approval process,” but many people don’t know or fully understand what it actually means. I’m excited to chat with you guys about this process and answer some frequently asked questions!

What is Pre-Approval?

Pre-approval means a lender basically makes a call on whether you’re eligible to qualify for a home loan and how much you can qualify for. They come to these conclusions based on proof of finances provided by the potential buyer.

Why Do I Need to Get Pre-Approved?

There are many reasons why pre-approval is not only necessary but also beneficial for you! Often people don’t realize how much money they’ll actually need to put down and how that relates to how much house they want to buy. Different down payments affect your monthly payments, mortgage insurance, etc.

By working with a lender, you can run different scenarios to help you determine the best strategy when deciding critical factors like house cost and size. For example, you may think you’ll save money by buying a smaller condo. But after factoring in monthly homeowner association assessments (monthly dues you pay to the condo association), you might find that a single-family home is actually more affordable.

When it comes to loans, a common mistake that people make is assuming that a loan product their friend used will work the same for them. Although there’s a possibility it could work for you, it’s not a safe assumption to make. No two loans are alike just as no two people’s finances and life circumstances are exactly the same.

It’s important to note that loan products have different costs, such as varying lender origination fees. You can work with a loan officer to help learn the cost of a loan, how the loan process works, and which products will work for you. While your costs might not be exact at this stage, you can get a good idea of what to expect.

Gaining this awareness and comfort of shopping for a house that you know you can afford and make payments on, is perhaps one of the biggest reasons to get pre-approved.

Being pre-approved shows buyers that you are serious and prepared to make an offer. In some competitive markets, people won’t even consider an offer unless a pre-approval letter comes along with it.

Is It Hard to Get Pre-Approved?

Getting pre-approved is a pretty simple process. You need to know your financial situation — how much money you consistently make, your assets, how much debt you have, and the sources of those debts — and articulate it clearly to your lender.

What Will My Lender Need to Check During Pre-Approval?

  • Your credit score. Yes, your lender will then have to pull your credit. Don’t worry, pulling your score once shouldn’t affect your score.
  • W2s or 1099s
  • Pay stubs
  • Tax returns
  • Bank statements
  • Account statements
  • Your list of monthly expenses

Gathering all these documents can feel like busy work and is typically the hardest part for you.

If you want to have an idea of whether you’ll get pre-approved before choosing a lender, a good first step is finding out your debt-to-income ratio, or DTI. Your DTI ratio helps a lender understand how much of your monthly income goes to paying debt and what you have left after those debts are paid. You can calculate the ratio by dividing monthly debt payments by gross monthly income.

The lower your debt-to-income ratio is, the better. A lower DTI will make you seem less risky to lenders.

Although each loan product is different, most lenders would prefer your debt-to-income ratio to be at 36% or lower.

I made a simple worksheet to help you easily deduce your own debt-to-income ratio. You can download and print yours here.

What Comes After Pre-Approval?

If you can’t get pre-approved, it can be a sign that you aren’t ready to buy a house yet. In that case, work with your lender to identify what you need to change or improve before trying again.

If you are pre-approved, then comes the fun part!

Basically, with your pre-approval letter you are ready to go out and confidently look for homes with the help of your real estate agent. When you make an offer that’s accepted, you’ll officially apply for a loan, and the lenders will go over all your documents again.

Note that you have the option to choose a lender thta didn’t grant your original pre-approval.

In fact, once an offer is accepted, it’s a good idea to get a loan estimate from two to three different lenders and compare them to see which terms are the best fit for you. Things to consider are loan fees, interest rate, and annual percentage rate.

By the way, APR (annual percentage rate) is a good measure of your loan costs because it’s broader picture of your costs than the interest rate. It takes into account points and mortgage fees among other things. So it’ll be higher than the interest rate.

The lender will let you know how long you have to decide on a mortgage before your loan offer expires. Once you decide on a lender, it’s time to go buy your dream house!

Remember: Don’t be overwhelmed! One of the many reasons to choose a professional loan officer and a good real estate agent is that they can help explain these processes and walk you through the difficult steps. That being said, I hope this article helped you to understand the basics about the pre-approval process.

Good luck, friends!


Looking to buy or sell a home?

Chris Lee and Rusty’s Team at RealtySouth  205-233-5183

new team photo

6 Smart Home Products That’ll Make Your Home More Functional Today


Woman in a smart home with a smart mirror

A couple are super fun to use and may even enhance your home’s value.

Image: Ghislain & Marie David de Lossy/Metamorworks/Getty

Home trends come and go. But it’s functionality that wins in the end. Because smart functionality almost always adds some intrinsic value to your home.

That’s why these smart home products, especially the ones that make you safer, are some of our favorite home upgrades.

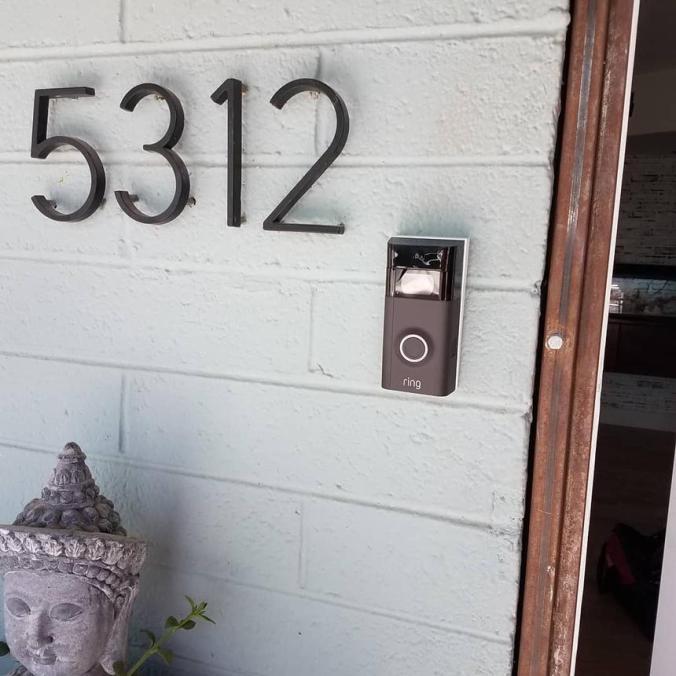
#1 Video Doorbell

smart-home-products-video-doorbell-standard_1fdb190dde953528c537f40da9cb576a_860x860_q85

A video doorbell with a Buddha statue beside itImage: Photo and installation by James Wesolaski, GET LIT Electrical Services LLC

WiFi-enabled video doorbells will let you see, hear, and speak to whoever is at your door via a smartphone, even when you’re not home.

It’s like Facetime but for your house. It alerts your phone and turns on the camera when someone rings the bell or comes near. You can tell the UPS guy to leave the package at the door or say, “Be there in a minute!” — whether you’re in the bathroom or thousands of miles away. So much for casing the joint while you’re out of town.

Video doorbells can even help catch a thief because you can see them on camera.

They’re not expensive — at most, around $200 — and you can install one yourself with some basic tools

#2 Smart Door Locks

smart-home-products-smart-locks-retina_standard_0de9a908a86db674b6bf6d6c260bff6e_860x953_q85

Keys are so 20th century. With a smart lock, you can lock or unlock your door with your smartphone or voice. You can text digital keys to friends, the dog sitter, or the delivery guy, giving them temporary access, which is waaaaaay safer than the old key-under-the-doormat routine.

Plus: Think you forgot to lock the house? You can whip out your smartphone and check. On the stoop with arms full of groceries? Just tell the lock to open.

Check out the August Smart Lock or the Kwikset Kevo.

#3 Home Generators


The number of power outages from bad weather has more than doubled in the last 15 years, so generators are becoming a thing.

But not those noisy, portable, diesel ones. You want a generator that’s built into your home. They look like an HVAC unit and run on propane or natural gas, so they don’t belch out smelly gases or require refueling every couple of hours. They’ll kick on automatically when the power goes off and can even be operated from a smartphone.

It might not be a home investment you’ll eagerly Instagram upon installation, but when you’re still scrolling and posting during a killer snowstorm, you’ll be feeling pretty fancy.

#4 Smart Mirror

smart-home-products-smart-mirror-standard_b3a6dd5384f8b67a753ec7ae2fab449b_860x467_q85

Smart mirror in a home bathroomImage: Billy Ives

Even the ol’ looking glass is getting smart. Bathroom mirrors with voice-activated digital assistants can tell you the weather, give you traffic updates, and play your favorite podcasts. You can even tell your mirror to order more moisturizer the moment you realize you’re getting low.

Check out Kohler’s Verdera Voice Lighted Smart Mirror, an Alexa-enabled smart mirror. It also has motion sensors that turn on the light when you stand in front of it, giving you one less germy thing to touch in the bathroom.

There are prototypes out there for mirrors that advise on your wardrobe, health, and skin care, too; they’re just not on the market yet.

Obviously, everything in your home is not about ROI, and a smart mirror is no exception. Will it up your home value? Nah. Is it fun? Yes. Does it make life in one of your home’s most hectic rooms easier? Oh yeah.

#5 Indoor Gardens

smart-home-products-indoor-garden-standard_bfba552f7a685d688de46bed57aed4c1_860x851_q85

Houseplants have been having a moment for a while, but edible gardens are coming indoors, too.

More than a third of Millennials are growing herbs indoors, and a gardening industry report predicts the number of people growing plants inside is going to increase about 25% by 2021. It’s an especially good idea for homes that have little or no yard space.

We’re not talking pots of basil on the windowsill but permanent setups — like a built-in planter that also works as a room divider (mid-century, retro-cool factor included).

Or you can turn a whole wall into a hydroponic, vertical garden with PVC panels. Install a few smart grow lights, and you’re good to go.

#6 Smart Blinds

Throw some shade on high cooling and heating costs with WiFi-enabled blinds you can control with your smartphone or voice. They’ll even work with Alexa and Siri.

Program them to open or close at certain times of day, or when the room hits a specific temperature. Or if you’re reading and you want to open the blinds to let in more light, you don’t have to get out of your chair. “Alexa, open the blinds.” Done.

You can also pre-schedule your smart blinds to make your home more secure.

written by Leanne Potts
Looking to buy or sell a home?

Chris Lee and Rusty’s Team at RealtySouth  205-233-5183

9 Ways to Disaster-Proof Your Home Against Summer Storms


How to prevent problems when there is a natural disaster

Turns out a tidy yard and clean gutters do way more than just look nice.

Image: Jodi Jacobson/Getty

Sure, cleaning your gutters and trimming your trees may not seem like heroic tasks, but hey, when a thunderstorm is doing its worst outside, those mundane little jobs are your home’s armor.

So suit-up the whole place. These nine tips will get your home ready for summer disasters, like water damage to your home, power outages, and fires. (You’ll save yourself a pretty penny, too.)

#1 Clean Gutters to Prevent Water Damage

It’s a fairly simple task, but so easy to put off. Who wants to schlep out a ladder for an afternoon of gutter cleaning?

But clogged gutters mean storm water can overflow, saturating — and possibly penetrating — your home’s foundation. Gutter build-up can also contribute to water seeping into your attic and damaging walls.

While you’re scooping debris, check the downspouts for clogs by flushing them with water from a garden hose.

Or skip the hassle and hire a pro.

#2 Protect Your Roof from Storm Damage by Trimming Trees

You know what happens in severe storms. Tree limbs break away and fall. If huge tree limbs are dangling over your house, you’re at risk for major roof damage. Cut back limbs to reduce their weight.

Also, make sure they’re at least four feet above the roof. Tree limbs make great balance beams for critters to tumble into your attic; don’t make it easy on them.

#3 Install a French Drain to Keep Storm Water Away

Prevent fires with a French drainImage: Aquatarkus/Getty

French drain — named after a guy named French, not the country — is a lightly sloped trench (1 inch per 8 feet) filled with round gravel and a pipe that diverts water away from your house.

The drain can be shallow or deep depending on whether you’ve got a soggy lawn or a bigger problem with water entering your basement during heavy storms.

#4 Prepare for a Power Outage with a Generator

An hour in the dark is an inconvenience, but a power outage of a day or two — especially when it’s 100 degrees outside — can be hazardous to your health (and pricey, as all your refrigerated and frozen foods spoil).

Invest in either a portable or standby generator, depending on how much you want to spend and how much power you need.

Generators vary by wattage output — the amount of power they can generate at one time. So check appliance needs: a four-slice toaster might use a whopping 1,650 watts – way more wattage than a portable AC unit (often under 500 watts).

#5 Prevent Fires with Hardscaping and a Tidy Yard

Hardscaped back yard to prevent firesImage: YinYang/Getty

And you thought a well-maintained lawn and that flagstone patio were just for fab curb appeal (and to make the neighbors jealous). Au contraire. Stone doesn’t burn.

You can also deprive flames of fuel by keeping the grass short and irrigated, removing dry leaves and dead plants, and pruning dead branches. If you needed extra motivation to get off the patio and get that yard work done, there you go.

#6 Install Impact-Proof Doors and Windows

Think a door is just a door? When it’s rattling on its hinges mid-storm, you’ll change your mind.

Impact-resistant windows, doors, and garage doors can inhibit high winds that cause structural damage from entering your home.

Bonus: Impact-resistant features can also Save on InsuranceImpact-resistant windows and doors may get you a discount on your home insurance.protect your home from intruders, reduce outside noise, and stop warm or cool air from escaping.

#7 Update Your Insurance

Sometimes you really do need to read the fine print.

Once a year, review your homeowners insurance to make sure you can rebuild your whole house in case of a disaster. See if you’re adequately covered for things like flood damage, too.

Plus, make updates based on recent home improvements, like that fancy burglar alarm you just installed, and ask about any new discounts for bundling with your car insurance.

#8 Check Fire Extinguishers

Scary stat alert: 660 people died in home fires in just the first two months of 2018.

While a fire extinguisher doesn’t technically expire, it’s possible for its seal to weaken over time, causing the pressure to drop and rendering it useless. Check that the locking pin is intact and the pressure gauge or indicator is pointing to “full.” (Sometimes this is a green bar.)

And did you know you’re supposed to keep a fire extinguisher on each floor? Or that different rooms require a different type of extinguisher? If not, a fire-safety shopping spree might be in order.

#9 Pick Wildfire-Wise Plants

Prevent fires with fire-resistant plants like hydrangeImage: Shippee/Getty

Speaking of fires, homeowners too often don’t consider how their plant choices help or hinder them.

Plants with stems that contain wax, terpenes, or oils are super flammable — as are junipers, hollies, eucalyptus, and pines.

Particularly if you live in a wildfire-prone area, choose fire-resistant foundation plantings like azalea, boxwood, hydrangeas, and burning bushes. (Ironic, right?)

Succulents, like sedum, have high water content and are less flammable. If you use bark mulch, which is highly flammable, keep it moist. Less flammable mulches are gravel, decorative rock, or bark-and-rock combinations. You can find a whole bunch of plants appropriate for your area at Firewise.org

Looking to buy or sell a home?

Chris Lee and Rusty’s Team at RealtySouth  205-233-5183

How to Get Stains & Grease Off Walls


A child writing on a wall with crayonImage: Carrie Robinson

Learn how to clean 7 tough stains off your walls — and ensure a lasting paint job.

You can’t wait to cover up that nasty beige on your walls, but as you take a close look at all the areas you’re gonna have to prep you see a lot of grime, gunk, and stuff that looks too stubborn for your standard vinegar wash.

Any cleaning rookie can wipe off dust and cobwebs. But it takes a cleaning pro to scour grease stains, watermarks, and kids’ crayon and ink wall art.

Kitchen Grease on Walls

Grease is an occupational hazard of cooking. If only it wouldn’t ind it’s way onto your walls and cabinets, trapping all kinds of gunk. Yuck!

Good news. Any decent dish soap can remove grease stains on walls.

For small stains, mix: 1/4 teaspoon of soap in a cup of warm water, and wipe. Rinse with clean water, and blot until dry. Clean stubborn grease stains with solution of 1/3 cup of white household vinegar with 2/3 cup of water.

Dirt and Grime Buildup

The oil from your hands gets onto walls, cabinets, doors, and door frames. A wall eraser, like the Mr. Clean Eraser ($3 for 4 pads), easily wipes away these stains.

Wet the sponge and rub gently to avoid taking bits of paint off with the stain.

Or make your own homemade wall cleaning sponge:

  • 1 cup ammonia,
  • 1/2 cup white distilled or apple cider vinegar
  • 1/4 cup baking soda
  • one gallon of warm water.

Wipe the solution over walls with a sponge (or cloth), and rinse with water.

Crayons

Wall erasers work like a charm on crayon marks. If they don’t do the trick:

  • Rub marks with toothpaste (not gel).
  • Erase marks with an art gum or a pencil eraser; use a circular motion.
  • Swipe marks with baby wipes.
  • Sprinkle baking soda on a damp sponge and scrub marks.

Permanent Marker

Permanent markers are tough to remove from walls. Soak a cotton ball with rubbing alcohol and dab the stain. Or spray marks with hairspray, then wipe drips.

Ink

Ballpoint ink, which is oil-based, often melts away if you use foaming shaving cream, dry-cleaning solvents such as Carbona, or nail polish remover.

Make sure you open windows when using cleaning solvents and polish remover.

Mildew

Mildew is a fungus that eats soap scum and body oil. To remove from walls, spray with vinegar water: 1 tablespoon white vinegar to 1 quart water. Also, try an enzyme laundry detergent; follow the pre-treating directions on the label. Blot it on the stain, and then rinse thoroughly with water.

Water Stains

After you’ve solved the problem that caused the water stains, rinse with a solution of 1 cup bleach to 1 gallon of water to prevent mold and mildew from growing. Thoroughly dry with a hairdryer or fans. If bleaching doesn’t remove water stains, you’ll have to repaint. Prime the walls with a stain-killing primer, such as Kilz Paint.


Looking to buy or sell a home?

Chris Lee and Rusty’s Team at RealtySouth  205-233-5183

new team photo